Wooooooo!
I'm in Knitty! Well, my pins are - scroll down. Woooo! And did you see what a great issue it is? I think Amy has outdone herself!
And look here! My pins are at Schoolhouse Press! Woooooo all over again! This is so exciting; I am such a huge fan of Meg Swansen's! And I adore Cheryl Oberle. I'm feeling all gushy about it. :)
So onward to the no graft toe up sock cast-on tutorial (seen on a soap sack). :) I've also seen this called the figure 8 cast-on on the Wiseneedle site here. The first time I used it, on a top down hoodie, I had to fiddle a lot with it, but now it's getting easier. The whole idea of this cast-on is to keep from having to graft or seam the bottom of the tube you are knitting. Because of this, take special care not to twist any stitches. Twisted stitches will show up as little lumps when you tighten up the bottom.
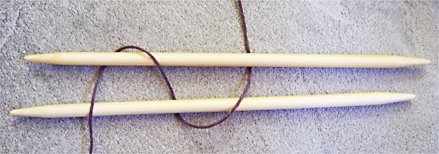
To start, select two dpns that are larger gauge than those you will be using. The bottom will be quite loose, but it will be tightened up in the last step, and it is easier to begin with more play in the yarn. In the following pictures, I am using US 9s to start a soap sack that will be worked on US 6 dpns.
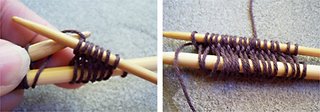
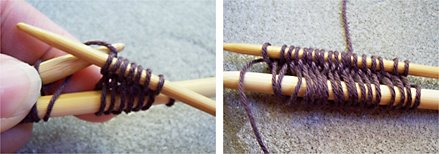
First, wrap the yarn around the needles thus:

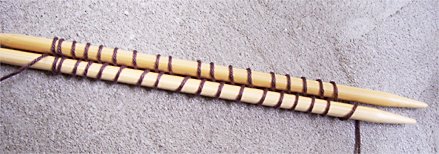
until you have the number of loops that you wish to cast on. I am casting on 36 stitches here:

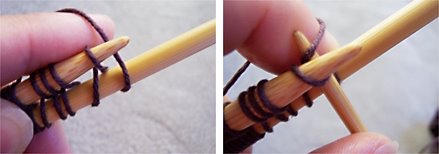
When you have the desired number of stitches, you will be starting to knit on the needle closest to you, using the needles sized for your project, and you will continue to knit around the needles and join the piece for working in the round. It's easiest if you move the needles so that the stitches are at the tip of the working needle and in the middle of the non working needle. In this picture, I am knitting the first stitch with the US 6s:

Continue knitting down the needle until you come to the end:
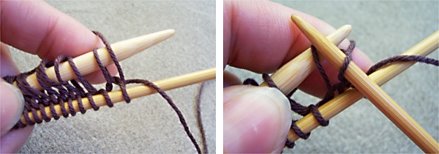
At this point, it is important to make sure that you still have enough loops on the other needle. When you get to the end, it is easy to lose that last loop! Now you will be turning the corner around the needles, just as though you are working in the round (which, really, you are).

Make sure you do not twist stitches! The stitches on this needle will lay opposite the ones on the first needle, so if you knitted into the front of the loops on the other side, you will now be knitting into the back, and vice versa.
Work down the entire row to the end (first picture) and then continue to knit around (second picture):

As you do more rows, you will be able to divide the stitches on four dpns (first picture). The second picture shows the soap sack after one lace repeat. The loose thread at the bottom:

will be snugged at the last:

And there you have it: the no graft toe (or soap sack bottom, as the case may be). :)
If you have questions, please let me know! It's so easy to show in person and so difficult online! And don't despair if it doesn't work the first time. It took me quite a few tries to get right, and, admittedly, was rather frustrating at first. But on the other hand, that's how I learned some tricks to it!
Tune in next time for a tutorial on the modified belly-button start shown in the Sept 4 entry. It's been requested and I can't refuse!
And look here! My pins are at Schoolhouse Press! Woooooo all over again! This is so exciting; I am such a huge fan of Meg Swansen's! And I adore Cheryl Oberle. I'm feeling all gushy about it. :)
So onward to the no graft toe up sock cast-on tutorial (seen on a soap sack). :) I've also seen this called the figure 8 cast-on on the Wiseneedle site here. The first time I used it, on a top down hoodie, I had to fiddle a lot with it, but now it's getting easier. The whole idea of this cast-on is to keep from having to graft or seam the bottom of the tube you are knitting. Because of this, take special care not to twist any stitches. Twisted stitches will show up as little lumps when you tighten up the bottom.
To start, select two dpns that are larger gauge than those you will be using. The bottom will be quite loose, but it will be tightened up in the last step, and it is easier to begin with more play in the yarn. In the following pictures, I am using US 9s to start a soap sack that will be worked on US 6 dpns.
First, wrap the yarn around the needles thus:
until you have the number of loops that you wish to cast on. I am casting on 36 stitches here:
When you have the desired number of stitches, you will be starting to knit on the needle closest to you, using the needles sized for your project, and you will continue to knit around the needles and join the piece for working in the round. It's easiest if you move the needles so that the stitches are at the tip of the working needle and in the middle of the non working needle. In this picture, I am knitting the first stitch with the US 6s:
Continue knitting down the needle until you come to the end:
At this point, it is important to make sure that you still have enough loops on the other needle. When you get to the end, it is easy to lose that last loop! Now you will be turning the corner around the needles, just as though you are working in the round (which, really, you are).
Make sure you do not twist stitches! The stitches on this needle will lay opposite the ones on the first needle, so if you knitted into the front of the loops on the other side, you will now be knitting into the back, and vice versa.
Work down the entire row to the end (first picture) and then continue to knit around (second picture):

As you do more rows, you will be able to divide the stitches on four dpns (first picture). The second picture shows the soap sack after one lace repeat. The loose thread at the bottom:

will be snugged at the last:

And there you have it: the no graft toe (or soap sack bottom, as the case may be). :)
If you have questions, please let me know! It's so easy to show in person and so difficult online! And don't despair if it doesn't work the first time. It took me quite a few tries to get right, and, admittedly, was rather frustrating at first. But on the other hand, that's how I learned some tricks to it!
Tune in next time for a tutorial on the modified belly-button start shown in the Sept 4 entry. It's been requested and I can't refuse!
Labels: tutorials
posted by Romi at 7:44 PM
![]()
![]()


3 Comments:
Congrats on knitty! Cool tutorial. Thanks!
Big Congrats on Knitty!
Thanks for the tutorial!
Thank you so much for this! One of these days I am going to get the courage to try it--and I saw you in Knitty-woo hoo is right :)
Post a Comment
<< Home