Tutorial: a grafting trick
For some reason, the Kitchener Stitch and I have never really been on speaking terms. And something had to be done. Really. I know I am not the first to try this, but I may be the one who uses this trick most often! For all of those of you out there who cannot seem to graft without dozens of little errors, this is for you: grafting using a waste piece of yarn as a path through the stitches.
Shown below are the two halves of my soon to be released Delta Queen scarf, knit from Habu bamboo lace (my current favorite thing in the world!). The scarf is grafted in the middle. When I finished the sides, I worked a row of stitches in a different colored waste yarn (ETA: in pattern, which in this case was a plain knitted row). When I grafted them together, I followed the pathway of the waste yarn. Here's how it's done....
First, keep a tail at least three times the width of the piece you will be grafting. I always tie the waste yarn to the working yarn with a slip knot, just to make things easier. I undo it later.
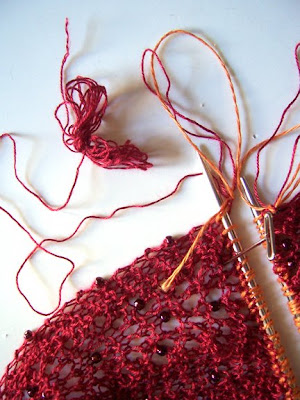
I lay out the two sides...

and pin them out. I have tried this with both right sides and with both wrong sides facing, or with one right and one wrong side facing. It didn't seem to make much difference in garter stitch. This is a right side and a wrong side.
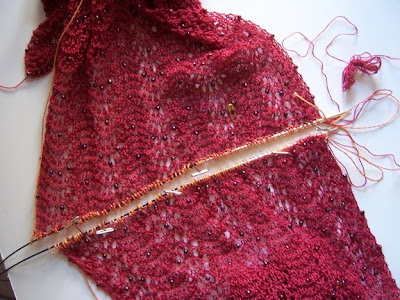
With the working yarn tail (at least 3x width of the scarf) threaded through a blunt tapestry needle, begin following the path of the waste yarn, working loosely so you can see where you have joined the pieces. It is important to keep in mind here that you are "knitting" the row that holds these two pieces together.

As you go, you can keep the waste yarn in the stitches. You will be able to unzip it later.

I also often leave the needles in while I work the initial loose row of kitchener, being very careful to follow the path of that waste yarn through the stitch! Note: this is regular old kitchener stitch, and a great tutorial can be seen here. My little trick is just that: a little trick so that I don't get lost in the middle of what I am doing when the kids call me. :)
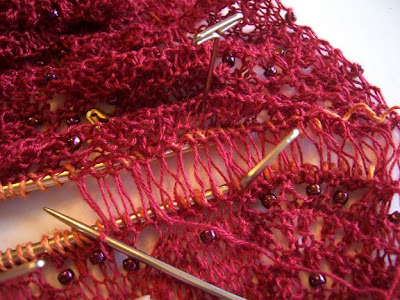
When you have worked around five inches or so, go back to start tightening up the grafting. Don't over-do it though, as it is very easy to go back to tighten things up again, but very difficult to loosen the row once it is too tight.

Here it is tightened up a bit more.

After the initial tightening, go back and, if you have not already done so, unzip the waste yarn so that you can check how well the row of kitchener stitch blends.

Tighten it more if necessary.

Repeat these steps and at the end, you will have a lovely join! (Unfortunately my last pic of the join was blurry, and the scarf is now at Knitterly on display, but you can imagine it, right? Instead we have the requisite cheesecake shot.)

Delta Queen, comin' soon. :)
Labels: beads, delta queen, lace, tutorials
posted by Romi at 8:35 PM
![]()
![]()


11 Comments:
I have not seen this done before. When you knit the row of wast yarn, do you keep in pattern? or just knit? That may be an obvious question, sorry.
Great idea -- I just had to graft a garter stitch collar -- I did manage it but sometimes these little things take up far too much time!
I'll remember this next time!
Very cool trick! Especially if you have to graft in pattern.
What a smart idea. Thanks for sharing!
Good trick!
The only thing worse than having to kitchener a lace shawl is having to un-kitchener it. Guess how I know?
Your Delta Queen is simply "delicious". It reminds me of both a Danish Raspberry pudding my mother used to make when I was small, and a big juicy Pomegranate with its stained glass seeds.
Gorgeous yarn, beautiful beads, perfect design for both. I haven't tried bamboo, but I will now.
Happy Blogiversary! I feel like such a late bloomer; I just started a blog, and you're celebrating your second anniversay.
If it's not too much trouble, could you take a quick look and let me know what you think? Suggestions welcome. http://melaine-novembergirl.blogspot.com/
Can't wait till your "Delta Queen" pattern is available; you've done it again!
m
NovemberGirl on Ravelry
(I'm the one who kept going on about knitting her Muir from "lumpy bumpy yardsale linen" ( ;
now why didn't I think of that???? wink, wink ;-) I can't wait to try this as I hate kitch-ing as much as anyone. I've been able to avoid it in socks by doing other types of toes, but it's been a problem for my lacework. TY TY TY!!!
awesome! The "lace" equivalent of a "toe chimney" for an easy to trace path! definitely a "why didn't I think of that?" trick. and very nice tutorial!
Thank you for the great pattern and tutorial on grafting. After seeing it, I ordered the yarn and downloaded the pattern. It is just beautiful, or as I like to say, wicked awesome!
Thanks for the tutorial! I am going to graft Waves of Grain using this technique tonight! Just a question--why would you graft a right and a wrong side of a lace shawl together?
Thanks for designing such an awesome pattern! I can't wait to wear Waves of Grain!
I learned the basic idea from Lucy Neatby's sock book..the chimney graft. But your post just generalized the concept in a way to make it applicable to grafting any pattern together. I was just able to magically graft together a mobius garter stitch cowl ala EZ using your method! Just need to finish with the applied icord edge. Thanks! (Tara Prakriya)
Post a Comment
<< Home