Tutorials R Us
Since I still don't have any knitting to show you (until the new Knitty comes out - squeeeee!), here's another tutorial. :)
This is the method I use to place beads in my knitting when the hole is too small for even the tiniest crochet hook. It is a variation of a method I saw in Sivia Harding's Angel Pearls scarf pattern. I didn't have the the little doohickey she called for, so I improvised and used wire to place the Swarovski crystal pearls. And I've used this method ever since.
First cut a length of fine gauge wire - such as 28-34 - whatever you feel comfortable working with. Mine is about 3.5 inches long. You can find wire in hardware stores or craft stores. I just happen to have fine galvanized steel wire around the house because it's so handy for wiring things together. It's also great for placing beads in knitting.

Next, at about two thirds of the way across the wire, make a sharp bend - your fingernail will work perfectly for this.

Use pliers to flatten the wire. I am using chain nose jewelry pliers here, but others will suffice, as long as you use the flat portion of the pliers.

One side will be longer; this helps when adding the bead.

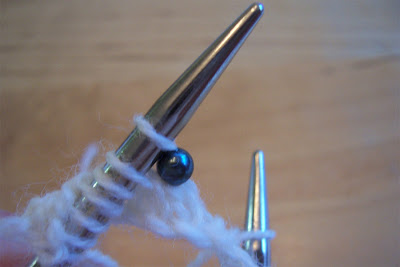
Hold the wire apart and insert through the stitch to be beaded while the stitch is still on the needle. Remove the stitch from the needle.

Insert wire through bead.

Push bead down onto both thicknesses of wire.

Push bead over stitch.

Place stitch back on needle
and knit as usual.

Voila!

The bead will not move around and it can be seen on both sides equally - great for reversible items!
Onward: anonymous said of the provisional cast-on tutorial "I used this crochet cast-on the one time I have tried a provisional cast-on and loved it...at first. When it came time to "unzip" and pick up the stitched to knit in the other direction, I found they were twisted every which way! Perhaps I did something wrong??? I know that I didn't make any extra stitches in the original crochet part; perhaps that was the problem?"
Hmmmm. My guess is that the crocheted chain became twisted on the knitting needle as you were knitting the first row. It needs to stay completely straight in order to be easily unzipped. I'll try mucking up my cast on and see what I can come up with. :)
In other news, Michelle is hosting a KAL for the talented Ruth Sorenson's (click on Strikning and then patterns for sale) new Kauni design.

Go check it out!
Now it's back to the salt mines for me!
This is the method I use to place beads in my knitting when the hole is too small for even the tiniest crochet hook. It is a variation of a method I saw in Sivia Harding's Angel Pearls scarf pattern. I didn't have the the little doohickey she called for, so I improvised and used wire to place the Swarovski crystal pearls. And I've used this method ever since.
First cut a length of fine gauge wire - such as 28-34 - whatever you feel comfortable working with. Mine is about 3.5 inches long. You can find wire in hardware stores or craft stores. I just happen to have fine galvanized steel wire around the house because it's so handy for wiring things together. It's also great for placing beads in knitting.

Next, at about two thirds of the way across the wire, make a sharp bend - your fingernail will work perfectly for this.

Use pliers to flatten the wire. I am using chain nose jewelry pliers here, but others will suffice, as long as you use the flat portion of the pliers.

One side will be longer; this helps when adding the bead.

Hold the wire apart and insert through the stitch to be beaded while the stitch is still on the needle. Remove the stitch from the needle.

Insert wire through bead.

Push bead down onto both thicknesses of wire.

Push bead over stitch.

Place stitch back on needle

and knit as usual.

Voila!

The bead will not move around and it can be seen on both sides equally - great for reversible items!
Onward: anonymous said of the provisional cast-on tutorial "I used this crochet cast-on the one time I have tried a provisional cast-on and loved it...at first. When it came time to "unzip" and pick up the stitched to knit in the other direction, I found they were twisted every which way! Perhaps I did something wrong??? I know that I didn't make any extra stitches in the original crochet part; perhaps that was the problem?"
Hmmmm. My guess is that the crocheted chain became twisted on the knitting needle as you were knitting the first row. It needs to stay completely straight in order to be easily unzipped. I'll try mucking up my cast on and see what I can come up with. :)
In other news, Michelle is hosting a KAL for the talented Ruth Sorenson's (click on Strikning and then patterns for sale) new Kauni design.

Go check it out!
Now it's back to the salt mines for me!
Labels: tutorials
posted by Romi at 12:19 PM
![]()
![]()


38 Comments:
Rosemary- Again, thanks for showing us a new technique. I've tried the crochet hook method.
Now I'm completely obsessed! All I want to do is visit bead stores!
Thanks for the honorable mention :)
I have nice knitting friends!!
Your photos are great! Sure wish we had some bead stores in our area. We are limited to Michaels & AC Moore ~ chain type craft stores. I am so looking forward to your book.... Hey will your blog-friends have the opportunity to by autographed copies?!! :)
Another great tutorial! That's why I love the internet.
I have done bead knitting where you thread all the baeas ahead of time -- which is great, but limiting. Your wire hook method is wonderful and versatile. thanks for sharing! And thanks for your supportive comments!! ;)
Nice photo's of the using of the beans.I use the same way with the beans, but instead of iron yarn I use a very small crocket hook.
Thanks for the tutorial, again !
I've used the crochet hook which I have in a very small size (0.6 mm ) , but if these are still too big I can always use a wire !
that was a great tutorial:-) Gosh the Kauni cardi is gorgeous!
Thanks so much for that! I though I had to do it the way Susan mentioned and was always put off by it. I think I can do it your way!
Ooo! that's neat....I really want to try something with beads someday and I think this tutorial will come in handy. Thanks!
Thanks for the cool technique and a link to that beautiful sweater!! My earrings arrived yesterday and I LOVE them!!
How funny! I was contemplating this last night and then stopped by your blog today to find: a tutorial. lol
Thanks Rosemary....this technique will come in mighty handy....and your pictures are wonderful and informative!
The Kauni cardi is definitely awesome....a bit above my head, right now....but definitely drool worthy!
Very cool tutorial. I think I may be in love with that new Kauni. I may even have to end my "no color knitting" moratorium. Going to click over now...
Clever! I've been putting off doing beading this way because I can't find big enough beads that I like. Looks like I've got more options now.
Cool--thank you! And then that picture at the end just tops it off. Wow.
Yay!! You're going to be in Knitty again!!!! I can't wait! : )
I did beading that way with a piece of fishing line for the my Icarus beading tutorial. I like beading that way. It's really easy to put the bead EXACTLY where you want it.
And yay for Knitty! I've got something in the surprise for the next one :)
i use the same technique for beads, but with these flossers-
http://tinyurl.com/d5khs
fabulous sweaters!
Cool! :)
I just noticed you're in Sonoma, my brother's in Marin!
Aha! So that is how it is done. Very cool!
Thank you ever so much for this tutorial - actually, this is a "Save-The-Dipsy" tutorial as it seems ;) Really - I've refused to add beads to my knitting so far because I was just so worried that I might mess everything up completely - with your wire hook method and your ideas I feel safe enough to try it out now, and I have the feeling that it'll really work! Thank you!
Wow, fabulous! I have been wanting to use pearls but the holes have been too small for my teeny crochet hook... but I have scads of wire and think this will do just awesome!
Thanks for sharing!!
Excellent tutorial! What a great idea to use wire for that method of bead attachment. (It's my favorite method. I use it for shank style buttons, too.) Thank you! Those sweaters at the end are just ridiculously gorgeous.
Thank you for the tutorial, that is very neat! I so want to do a beaded sweater. It's on my list of knitting must haves :)
That's such a great idea for adding beads! I've been sitting in front of all of the supplies for months and I never would have thought of it.
thanks so much for the bead placement with the wire -- very clever! & I like it much better than prestringing them onto the yarn. Janet
Yay! The new Knitty is out and the very first pattern is gorgeous - of course, it is yours. I am wondering how it will look knit in several colors (I have half balls around of Kidsilk Haze from a series of scarves). Only time will tell! If it gets knit, I'll share pictures at twinset.us.
OMG, I've looked FOREVER for a reasonable explanation of how to add beads this small! You made it a "EUREKA" moment for me, thank you, thank you!
I didn't have wire in a small enough gauge for the crystals I was using, so I got my husband to snip off a few inches of a guitar string (high E) and it worked perfectly!
You Rock! After seeing your pics and explanation, I so understand how it works, now. Somehow, you made it easier.
Thank you for showing the way. I now have the confidence to do something with all those beads I've been hoarding and the lace I've been knitting.
vau it`s beutifull laydies and their knitting, ou nou poor english, sorry thanks for your showing.....beads.....I love knitting and work with beads.
Uhm, potentially silly question:
what if you have to place those beads at YarnOvers?
I am assuming the same idea would not work?
So, how does one manage those? I am going to be trying my first ever beaded project soon, and was quite curious!
I love this tutorial btw, it is fabulous!
I think it should be fine with yarn-overs as well. I've never tried it, mind you. :) Most patterns don't have you place beads on yarn-overs, so I think you'll be fine!
thank you for the instructions... i have use it, with a great pleasure... see my blog :-)
Thanks for this wonderful trick. I now want to add beads to something but I also love this cowl pattern so that would be a great place to start. Luckily enough I also have a few odd balls of mohair.
I grow my own yarn(wool) and like to knit things that people don't expect to see from handspun. I can't wait to try this great technique on a fine lacy cowl. Many thanks for your generosity.
Penny.
Rosemary,
Je relie votre tutoriel sur mon blog : http://mamilinetricote.canalblog.com/archives/2013/11/30/26492527.html
S'il y a un souci faites le moi savoir.
Bien à vous,
Mam'Yveline
Talk about old dogs learning new tricks! I'm 72, been knitting since I was maybe 7. I also spin and have several pounds of alpaca to finish, but OH! How I love a scarf I saw that gave me your link because I want to use beads on a shawl. Or maybe that lace scarf.
Thanks to you, I have learned the secret in less than 5 minutes. What the heck was I waiting for all these years!
Thank you.
Post a Comment
<< Home